• Skip to primary navigation
  • Skip to main content
  • Skip to primary sidebar

A Lifestyle Blog

  • About
    • Work With Me
      • Delightful Life Media
    • Privacy Policy & Disclosures
  • Taste
    • Breakfast
    • Lunch
      • Salads
      • Sandwiches
    • Dinner
      • Grilled
      • Sides
      • Pasta
      • Rice
    • Appetizers
    • Desserts
    • Drinks
      • Cocktails
      • Non-Alcoholic
    • Snacks
  • Travel
    • United States
      • Kansas
      • Missouri
      • Nevada
      • Nebraska
      • New York
      • Oklahoma
      • Texas
      • Wisconsin
    • Mexico
  • DIY
    • Projects
  • Contact
  • Lifestyle
  • 100 Things to Do in Wichita Before You Die

oven

4 Small Kitchen Appliances Every Cook Needs

November 24, 2020 by Vanessa Whiteside Leave a Comment

Affiliate disclosure: As an Amazon Associate, I may earn commissions from qualifying purchases from Amazon.com. 

Getting a meal on the table is hard enough with all of life’s daily demands, so there is no shame in maximizing the convenience of small kitchen appliances to get the job done quickly. The four timesavers that I can’t live without are listed below and I really think you’ll find that they make preparing meals easier.

Alright, I’m breaking down this short list based on each piece of equipment’s affordability and efficiency. Let’s dive in.

BLACK AND DECKER TOASTER OVEN

Most people consider this counter appliance to be one used by college students or individuals who don’t cook much. A toaster oven is incredibly versatile and a HUGE timesaver when you want to cook or reheat a meal. I can’t tell you how many times I’ve used it to prepare nachos, small pizzas, open-faced sandwiches, and even roasted garlic.

Life happens. You don’t always have the time or energy to prepare full meal and the Black and Decker Toaster Oven is the solution.

Cost $43

FOODSAVER VACUUM SEALER

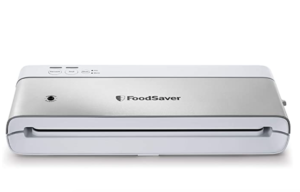
If you’re like me and you want to buy extra steaks when they’re on sale for later use, using a Foodsaver Vacuum Sealer is the best option to freeze them and keep frostbite flavor at bay. I also use it to store airtight packages of  fresh items from garden tomatoes (great for sauces!) to soup leftovers.

You’ll find that even though you are initially spending money on it and the roll of sealer bags, you save money overall by purchasing groceries on sale and storing them for later use. Later, you can just shop your freezer instead of heading back to the store!

Cost $60

MAGIC BULLET BLENDER

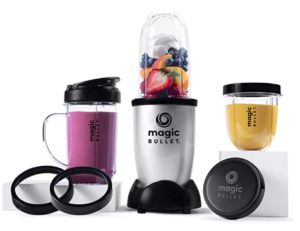
When you want to blend a fruit smoothie, mix a batch of dressing, or finely chop vegetables, the Magic Bullet Blender is your go-to appliance. The beauty of it is that you tote your mixed beverage with you using the handle cup and drinkable lid or simply store it in the refrigerator for later use. I once thought tiny drink blenders were only for people who mixed their morning protein or muscle powder smoothies. Wrong. You’ll love it’s practicality for everyday use and its small size requires minimal storage.

Cost $39

CUISINART FOOD PROCESSOR 

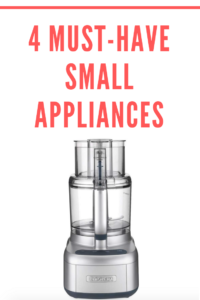
The big daddy of all the small appliances, the Cuisinart Food Processor should be in every home cook’s kitchen. No matter the task, it delivers. I’ve used it to prep vegetables for a week’s recipes, mixed up fresh dough, and made large batches of sauces and dressings. If you’re committed to your kitchen and love donning an apron to prepare recipes, you deserve the functionality of a food processor.

Cost $150

These four small kitchen appliances are a food lover’s dream because they make preparing a meal a joy. Eliminate long hours standing over a hot oven or prepping ingredients and invest in kitchen gadget that simplifies the job. You’ll be happy you did.

While these are my favorite appliances, I’m eager to hear what appliance you think I should have included on the list. Comment below with your suggestion!

Filed Under: Taste Tagged With: blender, cooking tools, food preperation, food processor, kitchen, kitchen gadgets, oven, small appliances, toaster oven, utensil, vacuum sealer

Baked Apples Filled with Oatmeal, Dates and Brown Sugar

October 1, 2017 by Vanessa Leave a Comment

Hello, Fall! Good to see you again.

October is the best month of the year. Why? It’s my birthday month (holla!), breweries are prepping for Oktoberfest, and the food….oh, the food!

Many cooks have prepared baked apples to welcome autumn, but my recipe incorporates chopped dates and walnuts with oatmeal to bring home real fall flavor. Leave room for dessert tonight because you will want to gobble up the entire apple. They serve well with vanilla bean ice cream too!

Prior to baking, stuff these babies as full as you can with the filling ingredients.

Here are the instructions for Baked Apples with Oatmeal, Dates and Brown Sugar:

1. Preheat oven to 350 degrees.

2. Wash two Pink Lady Apples. Core out the inside without penetrating the bottom. (Remove about half of the apple’s core.)

3. Add the butter to a small microwavable bowl and heat it about 10 seconds until it’s melted. Add remaining filling ingredients. Stir to combine all thoroughly.

4. Stuff each apple with the filling.

5. Set apples upright into baking dish. Add enough water around the apples until the bottom surface is covered.

6. Bake apples at 350 degrees for one hour. Serve warm. Devour.

The apple’s exterior color fades during baking, but the flavor is accentuated. Trust me. These apples are delicious on their own or served with vanilla bean ice cream.

One Delightful Life

2 large apples

Baked Apples Filled with Oatmeal, Dates, and Brown Sugar

It's not fall until you've served stuffed baked apples for dessert. Core, stuff, and bake!

15 minPrep Time

1 minCook Time

16 minTotal Time

Save RecipeSave Recipe
Print Recipe
My Recipes My Lists My Calendar

Ingredients

  • 2 cored, large Pink Lady apples
  • 4 T unsalted butter
  • Filling:
  • 1/4 c. oatmeal
  • 1/4 c. chopped dates
  • 1/4 c. brown sugar
  • 1/4 c. chopped walnuts

Instructions

  1. Preheat oven to 350 degrees.
  2. Wash and core apples but don't remove all of the inside of the apple. Leave enough apple that you don't pierce the bottom of the apple.
  3. Melt butter in a microwavable dish.
  4. Add remaining filling ingredients.
  5. Stir butter and filling ingredients thoroughly. Stuff filling into each apple evenly. (You can add a few extra walnuts or oatmeal, if you desire.)
  6. Place apples in baking dish. Fill dish with enough water to cover the bottom of the dish.
  7. Bake uncovered for 1 hour.
  8. Serve warm.
7.8.1.2
82
https://onedelightfullife.com/baked-apples-filled-oatmeal-dates-brown-sugar/
onedelightfullife.com

Nutrition

Calories

2242 cal

Fat

79 g

Carbs

376 g

Protein

36 g
Click Here For Full Nutrition, Exchanges, and My Plate Info
ESHA Logo

Stuffed Baked Apples

Filed Under: Desserts, Taste Tagged With: apple, apples, autumn, bake, baked, brown sugar, core, dates, dessert, fall, filling, fruit, ice cream, nuts, oatmeal, October, oven, Pink Lady, unsalted butter, walnuts

Primary Sidebar

SEARCH

Ammar
Hello! I'm Vanessa. Welcome to One Delightful Life, a blog created to add more delight to your life with delicious recipes, travel destinations, and lifestyle improvement ideas. Thanks for exploring my blog!

Archives

Contact Us

  • Email
    info@onedelightfullife.com

Popular Posts

Back to School Brain Breaks12K Total Shares
Going Underground in Historic Ellinwood, KansasGoing Underground in Historic Ellinwood, Kansas7K Total Shares
Weston, Missouri: Making the Most of a Weekend VisitWeston, Missouri: Making the Most of a Weekend Visit2K Total Shares
Cucumber Lime Vodka SplashCucumber Lime Vodka Splash926 Total Shares
How to Make the Most of a Weekend in Omaha, NebraskaHow to Make the Most of a Weekend in Omaha, Nebraska473 Total Shares
  • About
  • Taste
  • Travel
  • DIY
  • Contact
  • Lifestyle
  • 100 Things to Do in Wichita Before You Die

© 2022 · onedelightfullife ·