• Skip to primary navigation
  • Skip to main content
  • Skip to primary sidebar

A Lifestyle Blog

  • About
    • Work With Me
      • Delightful Life Media
    • Privacy Policy & Disclosures
  • Taste
    • Breakfast
    • Lunch
      • Salads
      • Sandwiches
    • Dinner
      • Grilled
      • Sides
      • Pasta
      • Rice
    • Appetizers
    • Desserts
    • Drinks
      • Cocktails
      • Non-Alcoholic
    • Snacks
  • Travel
    • United States
      • Kansas
      • Missouri
      • Nevada
      • Nebraska
      • New York
      • Oklahoma
      • Texas
      • Wisconsin
    • Mexico
  • DIY
    • Projects
  • Contact
  • Lifestyle
  • 100 Things to Do in Wichita Before You Die

vegetable

One Pot Kielbasa and Vegetable Soup

November 9, 2017 by Vanessa Leave a Comment

Have you ever had one of those days when the person on the end of the phone asks “What is for dinner?” and you haven’t even returned home from work yet? If only you weren’t so tired, right? The struggle is real.

What you need is One Pot Kielbasa and Vegetable Soup prepped, cooked, and ready to serve in less than thirty minutes! This warm and savory soup is easy to make and just what you want to eat on a chilly fall night.

The recipe, taken from Centennial Kitchen’s Fall Recipes magazine, is not my own. But I had to share it with you! For every kitchen cook who is exhausted before they hit the door after work, this soup is for you.

All you need to do is chop the following ingredients, add them to a large soup pot, heat for 12 minutes and serve!

  • 1 lb. smoked Polish kielbasa, chopped
  • 1 lg onion, chopped
  • 3 cloves garlic, minced
  • 2 lg carrots chopped (I used baby carrots)
  • 1 1/2 lbs small Brussel sprouts, halved lengthwise (half a standard bag)
  • 1 bay leaf
  • 1 tsp kosher salt
  • 1/2 tsp ground black pepper
  • 3 c. beef broth (I preferred 4 cups)
  • 1/4 tsp crushed red pepper (optional)

Combine all the vegetables, kielbasa, red pepper (if you prefer), salt and pepper, and the bay leaf in a pot. Add the broth and heat until boiling.

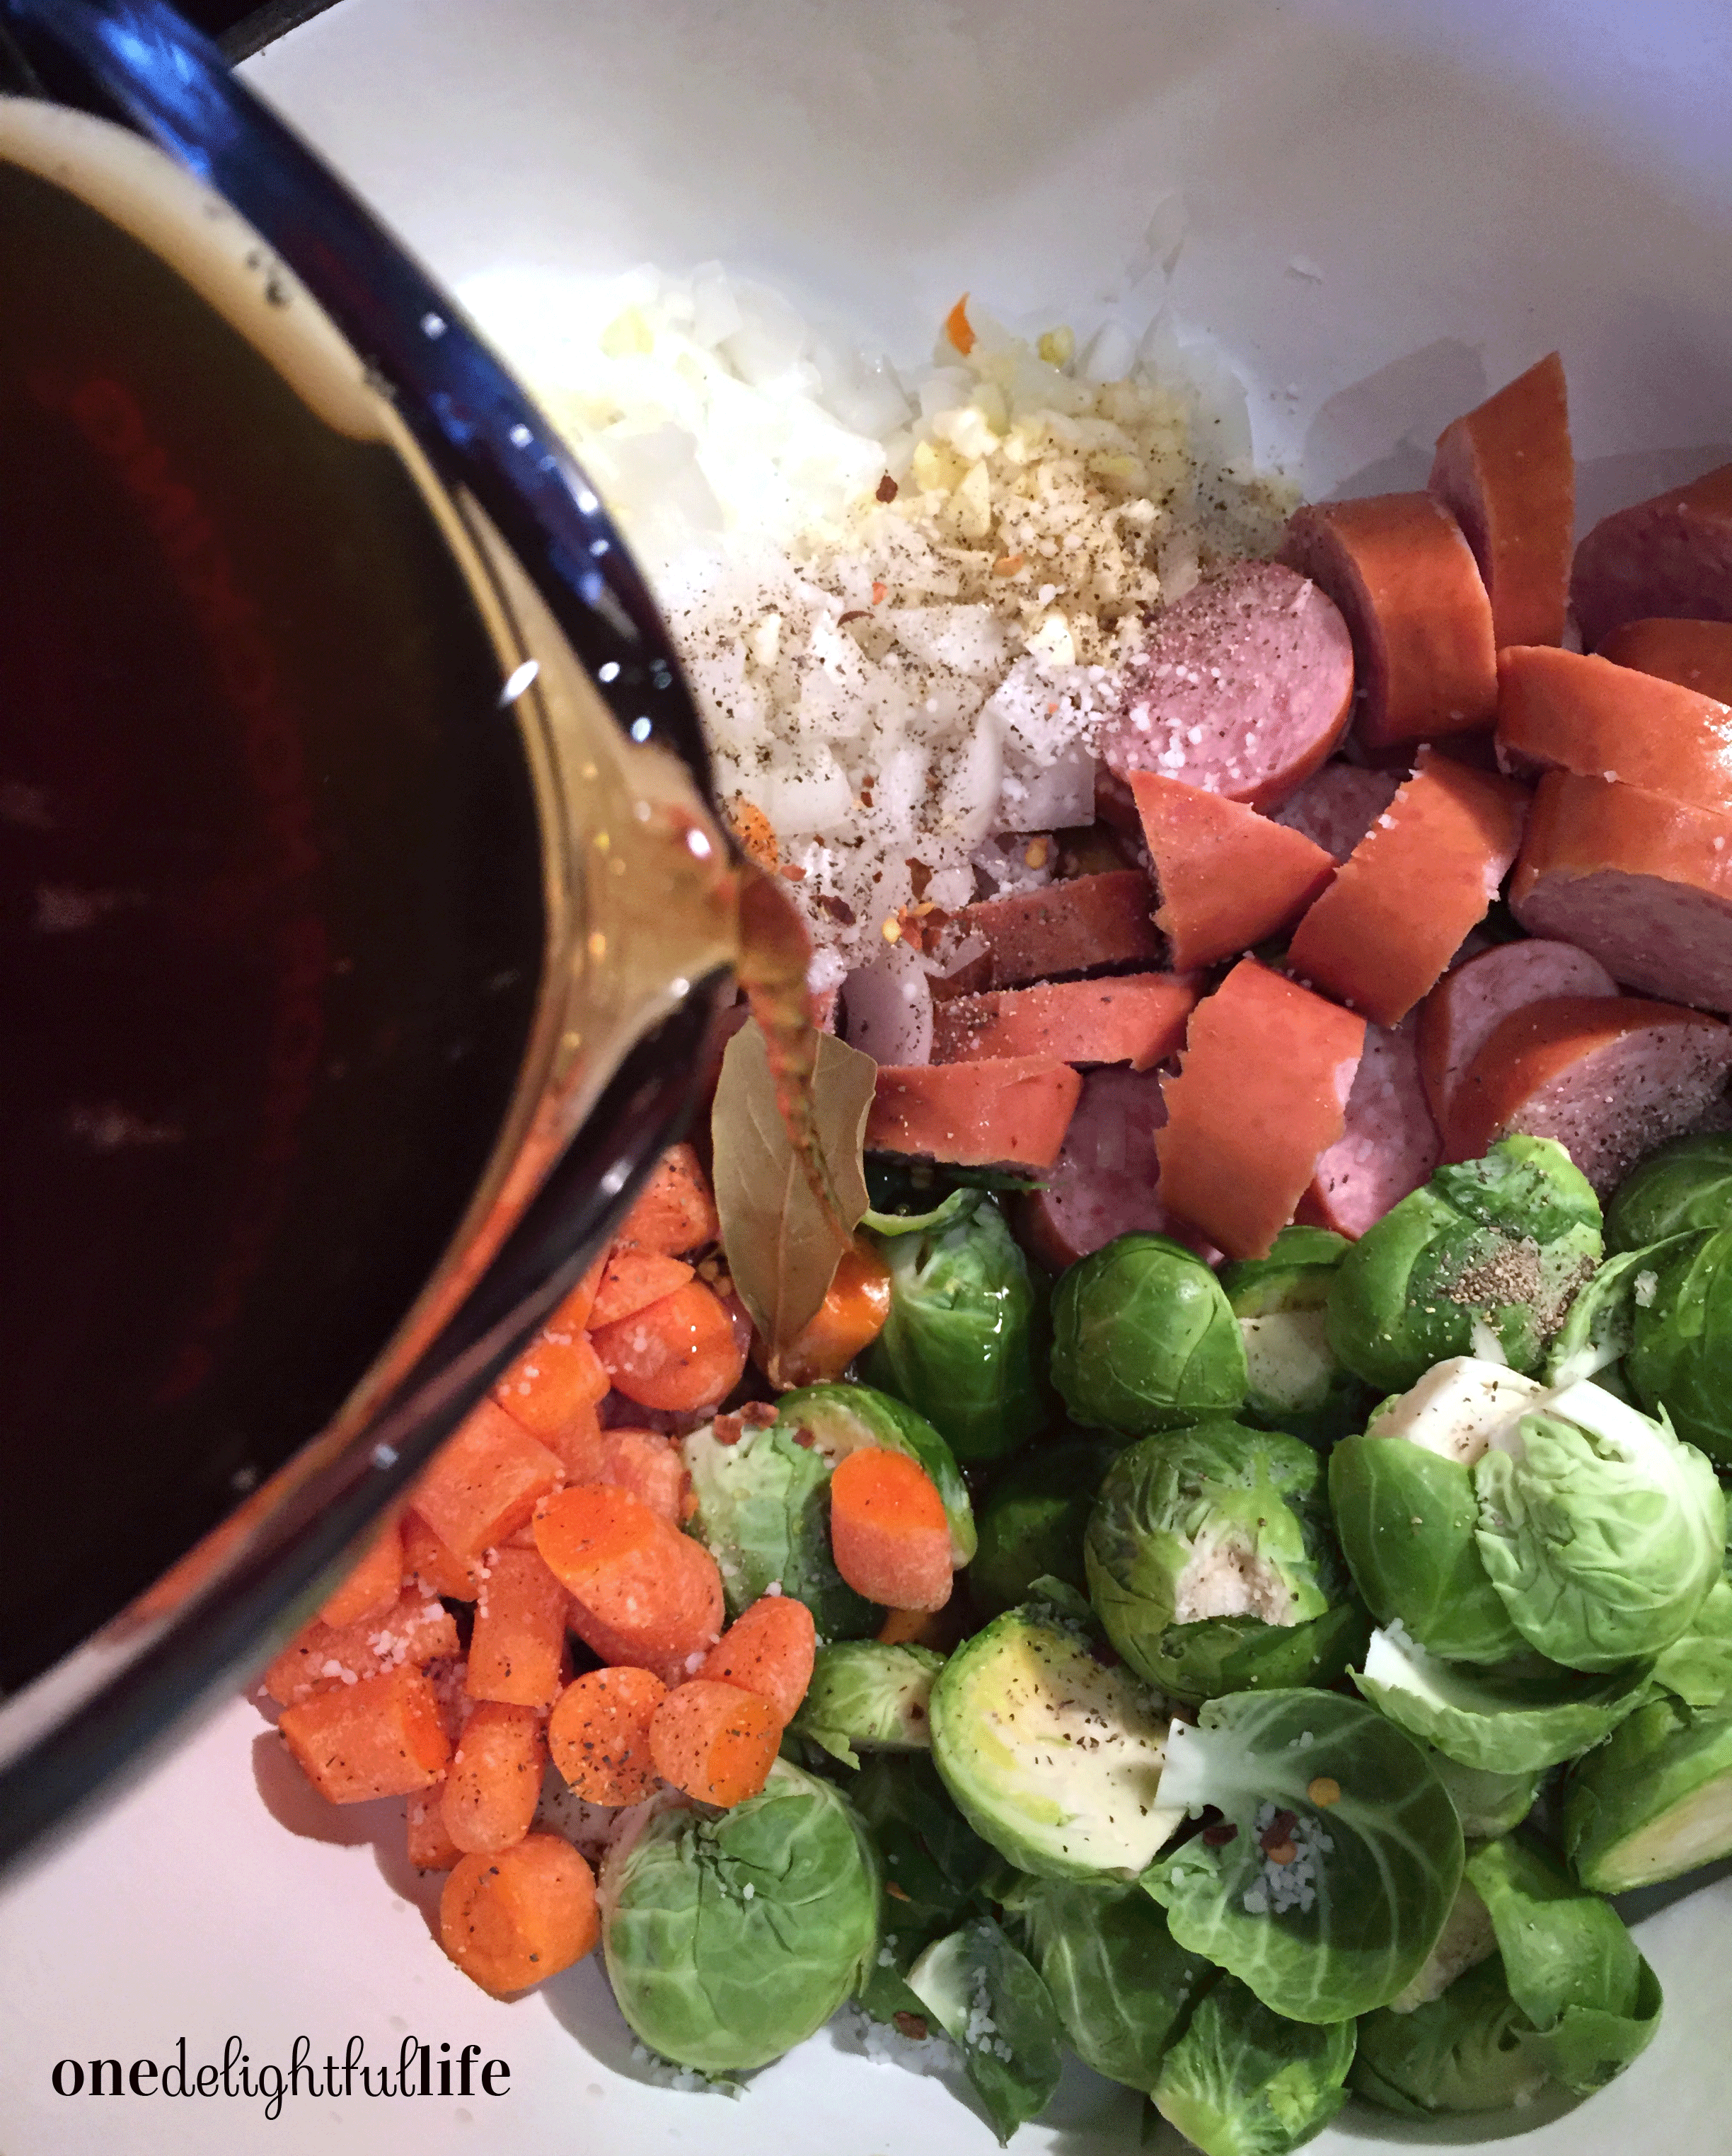
Once the soup begins to boil, reduce the heat to medium. Cover and cook for 12 minutes until the vegetables are tender. Remove the bay leaf before serving.

When the leaves are falling from the trees outdoors and you’re craving a warm and hearty meal, One Pot Kielbasa Vegetable Soup hits the spot. Fill up a bowl with it and grab a blanket before you snuggle up on the couch and start your Netflix marathon. Enjoy.

PS. I almost didn’t tell you the best reason for making this recipe…there’s very few dishes!

Filed Under: Dinner, Taste Tagged With: autumn, bay leaf, beef broth, blanket, broth, Brussel sprouts, carrots, Centennial Kitchen, dinner, fall, garlic, kielbasa, magazine, meat, Netflix, onion, Polish, pot, red pepper, sausage, savory, soup, stew, vegetable

DIY: Dowel Rod Tomato Cages

July 9, 2017 by Vanessa Leave a Comment

Affiliate Disclosure: As an Amazon Associate, I may earn commissions from qualifying purchases from Amazon.com. 

Nothing is more rewarding for this city girl than growing my own food. I did it! I actually harvested homegrown tomatoes from container pots and I barely spent any money to do it. Look at those beauties below!

Jet Star tomatoes

I made inexpensive dowel rod tomato cages instead of buying the plastic-coated or metal variety. Here’s the awesome, cost-saving breakdown:

Because I bought the Jet Set tomato plant for $1, vegetable soil $6, and three dowel rods per pot $.80 each, I’d say that’s pretty inexpensive since I’m still harvesting tomatoes and it’s only mid-July. Since I split the bag of vegetable soil between two large pots, I spent about $6 per container pot.

After you add new soil and a tomato plant, you will need the following items purchased from a local hardware store to make DIY: Dowel Rod Tomato Cages. 

dowel-rod-tomato-cages

1 DIY Dowel Rod Tomato Cage:

  • 3 dowel rods cut to the length you need
  • 1 rubber band
  • jute twine

First, I used a handsaw to cut each dowel rod down to the length taller than each plant to allow for growth. Second, I inserted each dowel rod around the circumference of the container pots interior as if I was building a teepee. Third, I used a rubber band to bring together the tops of the dowel rods. I recommend using an extra-strong rubber band like the ones that come with your store-bought broccoli if you’ve got one in the kitchen junk drawer.

Lastly, to give the tomato leaves something to grow around and to enhance the strength of the dowel rods, I wrapped twine tightly around the outside of each cage in two places.

dowel-rod-tomato-cage
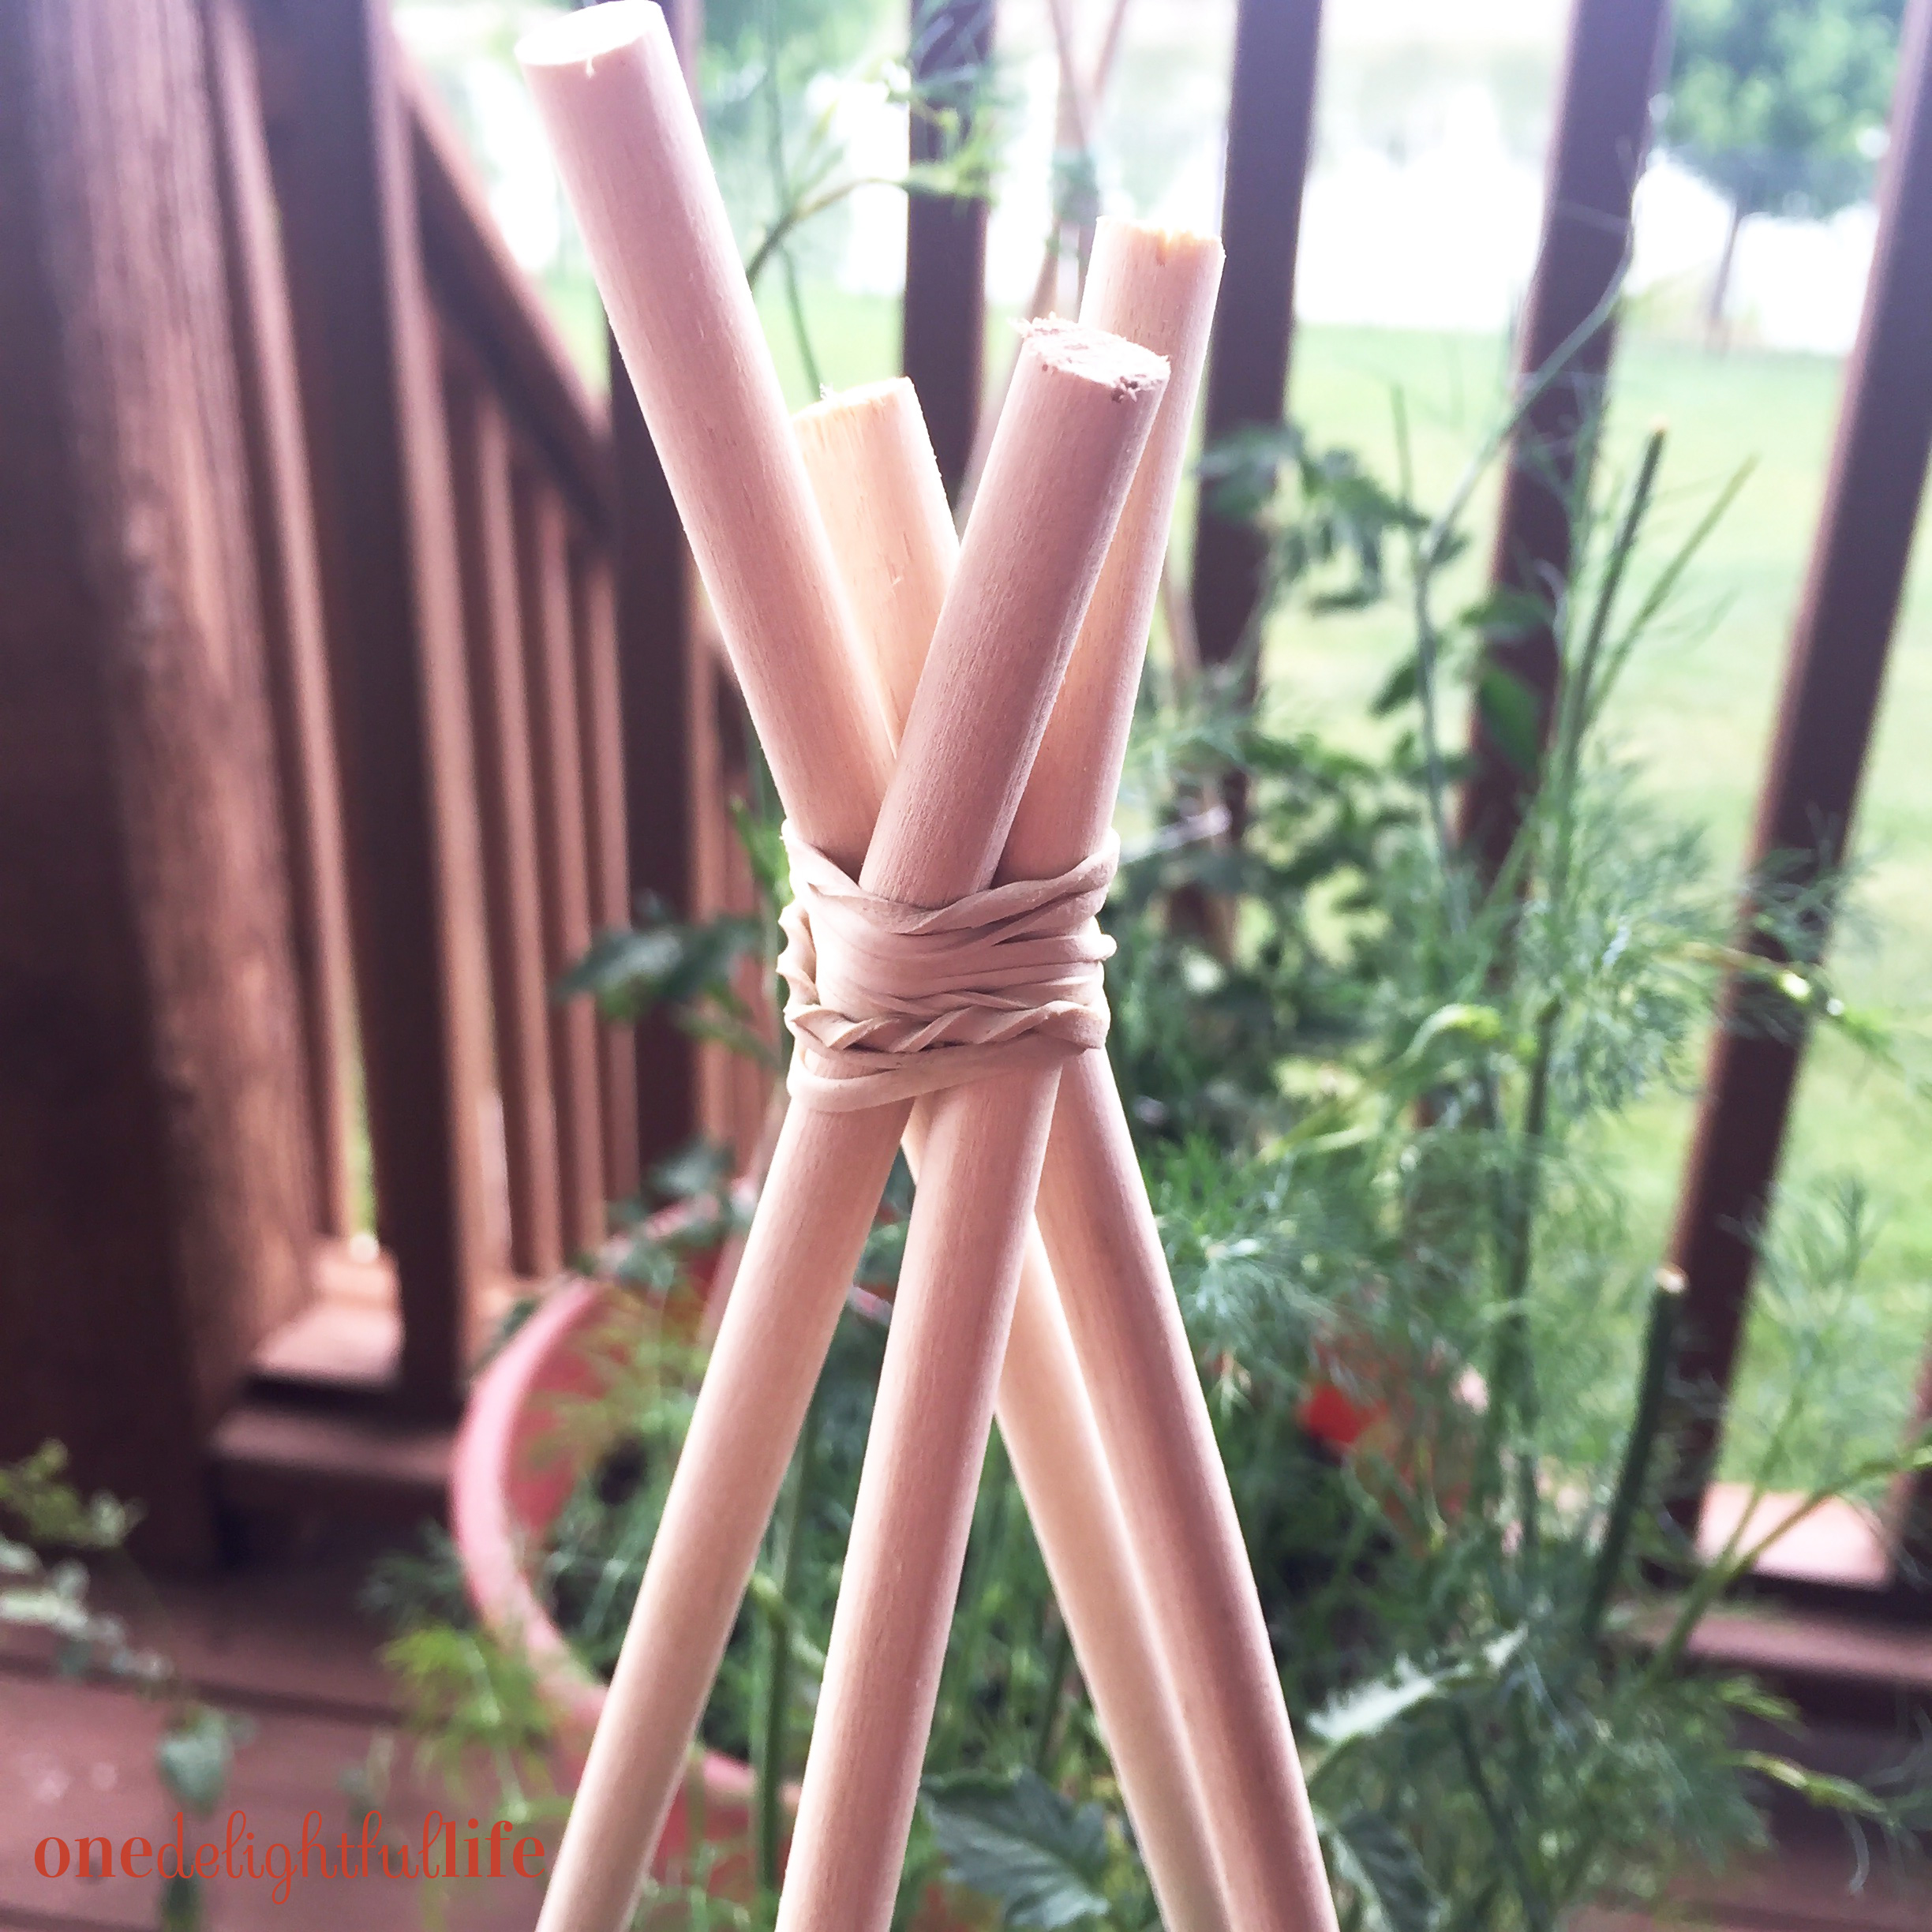
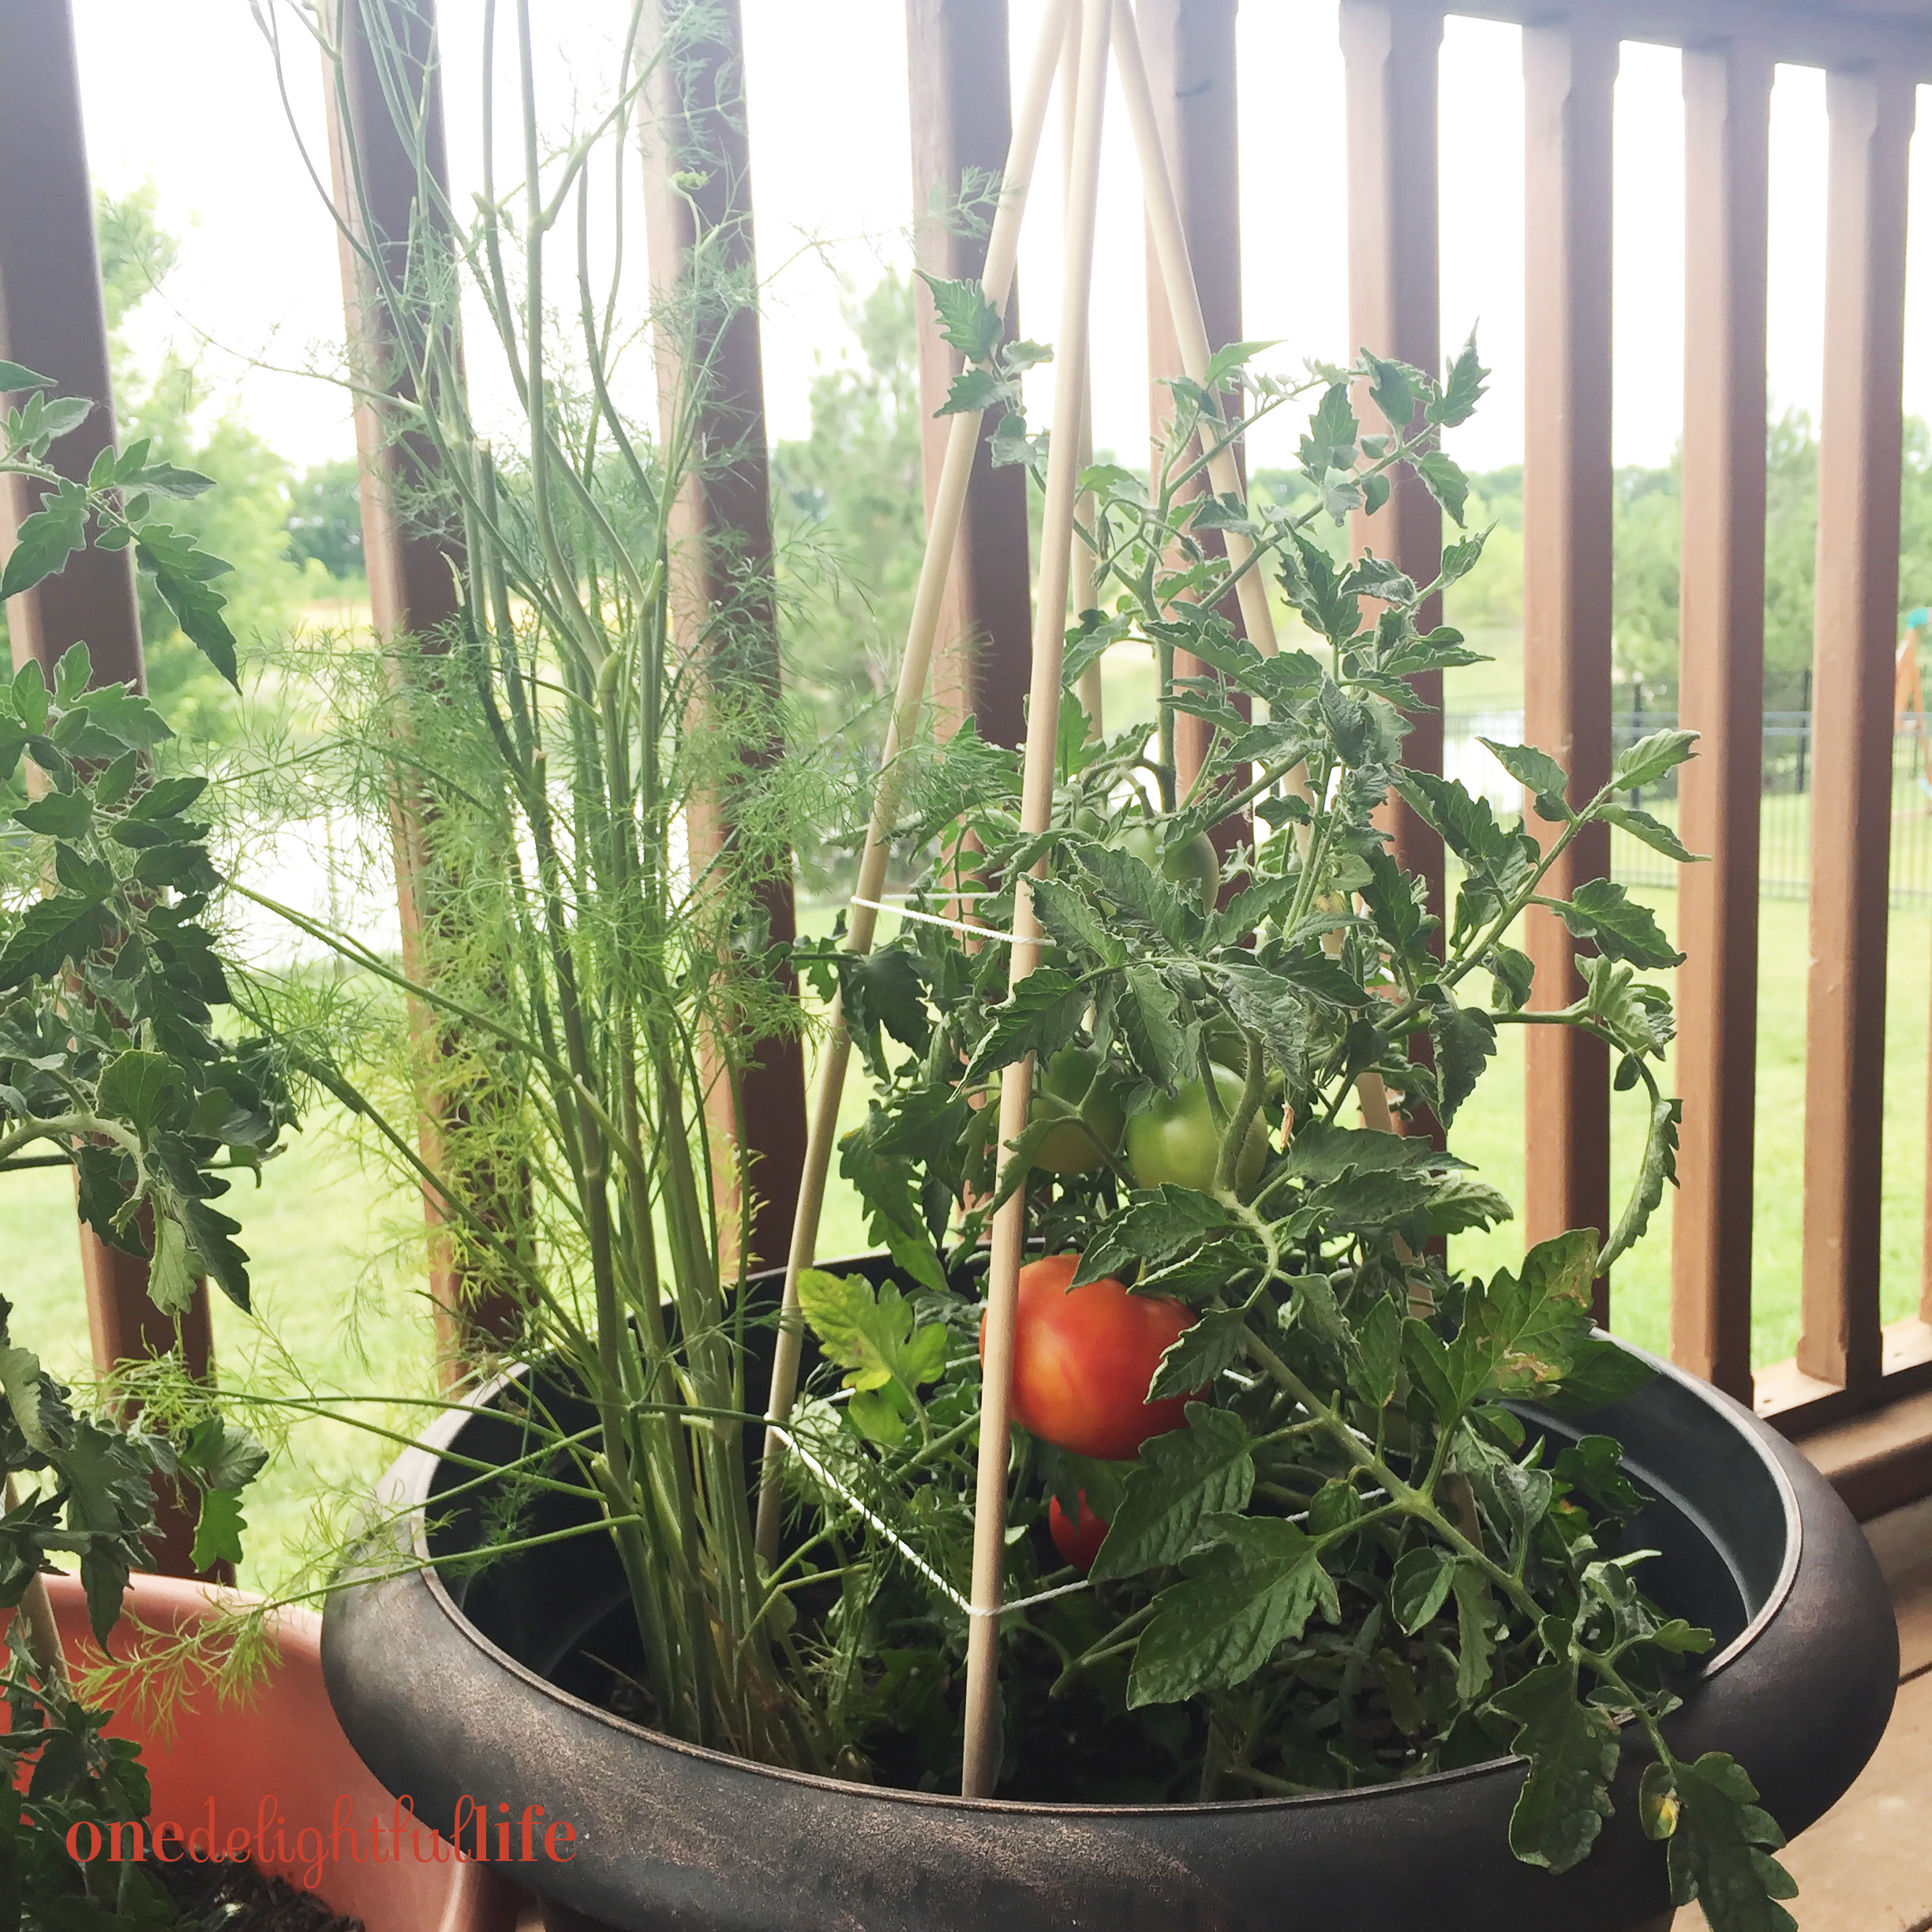
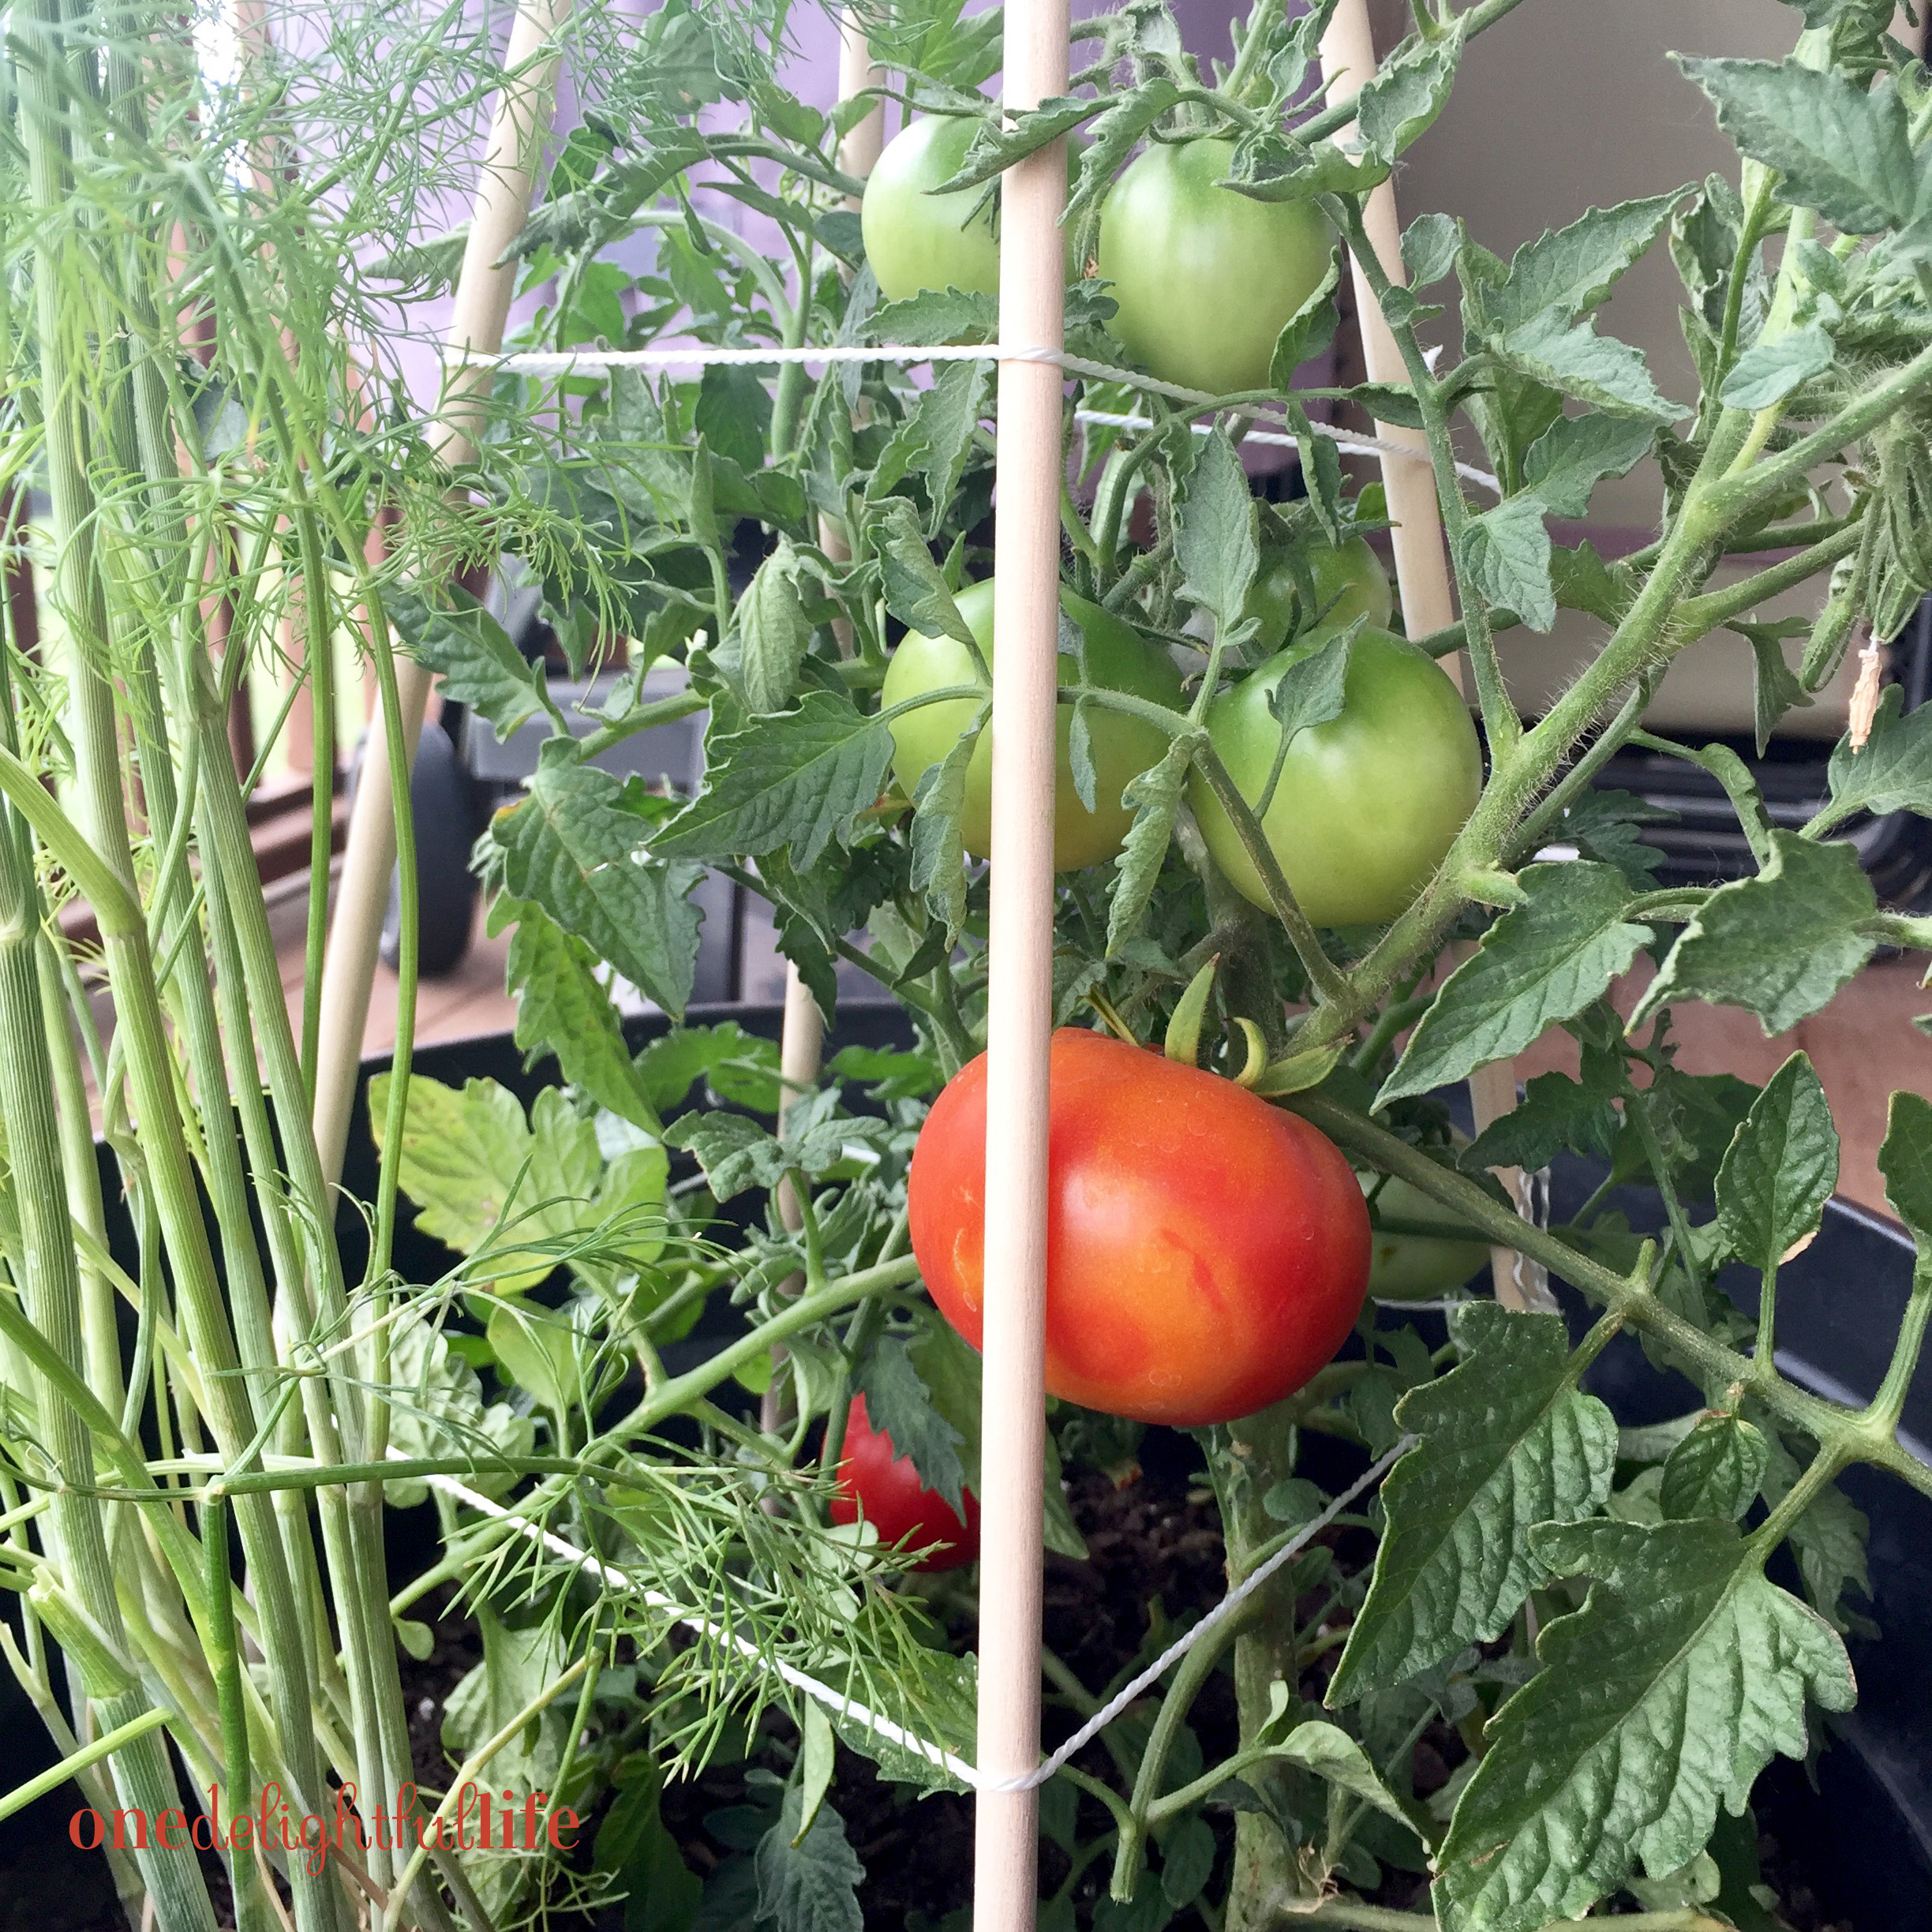
That’s it! I’ve been pleasantly surprised that I haven’t needed to reposition the dowel rods or twine even after moving the pots several times. I think you’ll agree that this do-it-yourself method for building a tomato cage is not only inexpensive but incredibly easy to do.

tomato cage

Now, if you’ll excuse me. A platter of Caprese salad made from homegrown tomatoes and basil with mozzarella and drizzled with balsamic and olive oil is calling my name.

caprese salad

Someone recently told me that their favorite summer fruit is…the tomato. I don’t blame them! Yep, it’s actually a fruit. It’s such a versatile ingredient whether used fresh like in a salad or stewed in a pasta sauce like my Dutch Oven Bolognese Sauce. 

If you’re in love with tomatoes this season, peel the skin and juice them to create a Michelada with Lime (think Bloody Mary made with Mexican beer) or used stewed and diced tomatoes inside Lone Star Turkey Chili with Sour Cream and Chives for tonight’s family dinner.

Happy tomato harvesting to you! I hope your container garden yields dozens of tomatoes this season. Let me know what DIY outdoor project you’re working on in the comments section below. Since you love to garden, so be sure to also check out How to Grow an Indoor Garden and How to Properly Fill a Raised Garden Bed!

tomato cage


Filed Under: DIY Tagged With: container garden, container pots, DIY, dowel rod, gardening, homegrown, tomato, tomato cage, tomatoes, urban farming, vegetable

Tangy Cream Cheese Dill Pickle Spread

January 21, 2017 by Vanessa Leave a Comment

Cleopatra thought eating pickles was what kept her beautiful. I’m going to eat more pickles.

Last summer I posted a video on ODL Instagram of our pickling experience after buying bags of cucumbers from a local farmer. They stored jars in our cool basement didn’t last long. We were going through two jars at a time.

My obsession with pickles didn’t wain. It’s winter and I’m still eating the briny fruit. Wait! Did I just refer to them as a fruit? Yes! Pickles are technically a fruit of the vine like tomatoes, but are known as a vegetables according to the U.S. Supreme Court. (Why they are responsible for solving this mystery is well, a mystery. I thought they had important court cases to review?)

My Tangy Dill Pickle Cream Cheese Spread recipe can be made in less than 10 minutes and goes equally well on a toasted bagel in the morning or on a water crisp cracker thin when guests come over. You could even spread it on sandwich bread instead of mayonnaise and stack it will sliced corned beef or roasted chicken. The dill-flavored possibilities are endless! Your spread will be ready in 10 minutes. Now, that’s easy!

While this spread is ready to serve in 10 minutes, allowing it to sit in the refrigerator for an hour allows the flavors to meld.

onedelightfullife.com

8 oz

Tangy Cream Cheese Dill Pickle Spread

Pickle lovers unite! This easy to prepare dill flavored spread is ready in 10 minutes.

5 minPrep Time

5 minCook Time

10 minTotal Time

Save RecipeSave Recipe
Print Recipe
My Recipes My Lists My Calendar

Ingredients

  • 1 package 8 oz. softened cream cheese
  • 1/2 c. finely chopped jarred dill pickles
  • 1/2 T. worcestershire
  • 1 T. chopped fresh dill
  • 1. T. pickle juice (optional)
  • salt and pepper to taste (optional)

Instructions

  1. Allow cream cheese to soften to room temperature and then add to a medium bowl.
  2. Add the remaining ingredients.
  3. MIx thoroughly.
  4. Refrigerate in a covered dish at least an hour.
  5. Garnish with a sprig of dill before serving.

Notes

You can add more worcestershire for flavor but it will make your spread a brown color.

7.8.1.2
65
https://onedelightfullife.com/tangy-cream-cheese-dill-pickle-spread/
onedelightfullife.com


Filed Under: Taste Tagged With: appetizer, bagel, breakfast, cream cheese, dip, egg, herb, pickle, pickle spread, quick, sandwich, vegetable

Buttery Spaghetti Squash with Garlic and Feta

November 13, 2016 by Vanessa Leave a Comment

There’s no faking the deliciousness of this side dish.

For those eaters who are unsure about squash or perhaps tried it before unsuccessfully, I encourage you to trust me on this one. Butter Spaghetti Squash with Garlic and Feta is incredibly tasty. This is not your grandma’s steamed squash.

To the cooks who haven’t made squash with these flavor combinations, hold on to your hot pads!

buttery-spaghetti-squash-with-garlic-and-feta

The beauty of making this side dish is that it is simple. All you have to do is poke it, bake it, scoop it, and serve! You could make this for a evening dinner with your family or to serve as a Thanksgiving side dish.

Step 1: Use a sharp knife and poke several slits into the skin of your spaghetti squash.

Step 2: Preheat the oven to 375 degrees. Place the squash on the foil lined baking sheet.

The beauty of cooking with baked spaghetti squash is that it is easy to incorporate flavors into it such as tomato sauce and mozzarella with sausage or in this case keeping it simple with savory butter and garlic and parsley. Of course, don't forget the creamy...the feta! Oh, wait, goat cheese would also be great with sun dried tomatoes.
The beauty of cooking with baked spaghetti squash is that it is easy to incorporate flavors into it such as tomato sauce and mozzarella with sausage or in this case keeping it simple with savory butter and garlic and parsley. Of course, don’t forget the creamy…the feta! Oh, wait, goat cheese would also be great with sun dried tomatoes.

Step 3: Bake 1 hour 30 minutes.  Remove using hot pads because it is blazing hot and likes to roll around. You can handle it like a football. Wow, I’m having flashbacks of playing Hot Potato in elementary school.

spaghetti-squash2

Step 4: Cut the hot squash length-wise and allow it to cool. Then, remove the seeds with a spoon just like you would a pumpkin.

spaghetti-squash3

Step 5: Once the seeds are removed, use a fork inside each squash half to create the “spaghetti” texture.

Step 6: The final step! Heat the butter on low heat, add the garlic, squash, salt and pepper. Add feta and chopped parsley just prior to serving. Serve warm and well tossed. (Ingredient measurements available on the included recipe card.) Enjoy!

spaghetti-squash4

Signature ODL 170x70px

onedelightfullife.com

6-8 cups

Buttery Spaghetti Squash with Garlic and Feta

This heavenly squash dish will restore your faith in all that is divine. Melted with butter and garlic it takes on huge flavor thanks to added parsley and feta.

5 minPrep Time

1 hr, 40 Cook Time

1 hr, 45 Total Time

Save RecipeSave Recipe
Print Recipe
My Recipes My Lists My Calendar

Ingredients

  • 1 large squash
  • 3 T butter
  • 3 chopped garlic cloves
  • 3 T feta
  • 2 T chopped fresh parsley
  • kosher salt
  • pepper

Instructions

  1. Preheat the oven to 375 degrees.
  2. Pierce the squash with a sharp knife several times.
  3. Transfer it to a foil lined baking pan.
  4. Bake for 1 hour 30 minutes.
  5. Remove squash for the oven and cut it in half length-wise.
  6. Allow it to almost cool completely.
  7. Use a spoon to remove the seeds.
  8. Scrap a fork through the squash to create the "spaghetti."
  9. Melt the butter and garlic in a large pan.
  10. Add in the squash and toss to coat evenly.
  11. Add a heavy pinch of kosher salt and fresh ground pepper.
  12. Just about the time you're ready to serve it, add the feta and fresh parsley.

Notes

The larger the squash, the more it will serve. Having trouble picking out a squash at the grocery store or farmers' market? Just remember that its rind is the color of butter and it's large in size.

7.8.1.2
60
https://onedelightfullife.com/spaghetti-squash-with-garlic-and-feta/
onedelightfullife.com

Nutrition

Calories

1541 cal

Fat

132 g

Carbs

19 g

Protein

64 g
Click Here For Full Nutrition, Exchanges, and My Plate Info
ESHA Logo

Filed Under: Sides, Taste Tagged With: feta, garlic, parsley, side dish, spaghetti squash, squash, Thanksgiving, vegetable

Overnight Pickled Green Beans with Garlic and Dill

August 23, 2016 by Vanessa Leave a Comment

Kids in school teased me for my height and called me String Bean. It seems only appropriate that I would post an article on how to make Overnight Pickled Green Beans with Garlic and Dill for my ODL fans like you.

Using my method for pickling, you don’t need to boil jars or buy special equipment. It’s a quick process using a simple brine and a few ingredients.

overnight-pickled-green-beans-with-garlic-and-dill2

Recently, we made pickled cucumbers after shopping at a local farmers’ market. I loved the way the refrigerated pickles turned out because they have the crunch of a Claussen Kosher deli style dill spear, Huffington Post’s number one “highly recommended” vote in their Dill Pickle Taste Test. Impressed with how easy it was to make tangy pickles last week, I tried my hand at green beans. It was just as simple! I think I’ve opened a can, or should I say jar, of ideas for other quick-pickled vegetables.

Another benefit for making your own pickled veggies? You save money! A jar of Claussen dills is nearly $5. I purchased these green beans for 99 cents a pound.

The green beans have a zesty flavor thanks to the sliced garlic and the sprigs of fresh dill give it that standard pickled taste. The acidic white vinegar preserves the beans and the use of kosher salt leaves the brine cloud-free. Next time, I want to try my hand at using flavored vinegar such as red wine vinegar or apple cider vinegar with new herb combinations. For example, you could substitute asparagus, radishes, or mushrooms for the green beans as well. Don’t be afraid to try various spice mixtures or fresh herb add-ins like chives, fennel, oregano or French tarragon.

What is your favorite way to eat pickled veggies? Straight out of the jar standing over the sink? In a cocktail? Tell me in the comment section below!

Signature ODL 170x70px

onedelightfullife.com

Overnight Pickled Green Beans with Garlic and Dill

These beans have a garlic dill flavor that adds crunch to any salad or serve as a healthy mid-afternoon snack.

15 minPrep Time

5 minCook Time

20 minTotal Time

Save RecipeSave Recipe
Print Recipe
My Recipes My Lists My Calendar

Ingredients

  • 1/2 c. water
  • 1/4 c. plus 2 T. white vinegar
  • 1 tsp sugar
  • pinch kosher salt
  • 1 mashed clove garlic
  • 1/8 c. fresh chopped dill
  • 1/2 tsp ground coriander (use coriander seeds, if you have them)
  • small pinch red pepper flakes
  • 10-12 oz. green beans

Instructions

  1. Bring water, vinegar, salt, and sugar to a boil in a small saucepan.
  2. (The sugar and salt will dissolve.)
  3. Remove the saucepan from the burner, stir, and allow the liquid to completely cool.
  4. Wash a large handful of green beans, trim the ends so they will fit in the jar, and set aside.
  5. Add garlic, dill, coriander, and red pepper flakes to the bottom of the mason jar.
  6. Add green beans to the jar.
  7. Pour cooled pickling liquid into the jar leaving 1/4" space near the top.
  8. Secure lid.
  9. Refrigerate for 24 hours.

Notes

Multiply this recipe if making more than one large (16 oz) wide mouthed mason jar of beans.

7.8.1.2
50
https://onedelightfullife.com/overnight-pickled-green-beans-with-garlic-and-dill/
onedelightfullife.com


Filed Under: DIY, Snacks, Taste Tagged With: dill, garlic, green beans, jar, mason jar, pickle, pickled, pickling, quick pickle, salad, snack, vegetable

How to Make Healthy Kale Chips

August 9, 2016 by Vanessa Leave a Comment

Kale was a super trendy vegetable a couple of years ago and it hasn’t lost its mojo yet.

Why is kale considered the world’s healthiest food?

The benefits of eating kale are tremendous because studies have shown that if you consume it, it improves your blood sugar levels, reduces your risk of cardiovascular disease, limits your risk of cancer, decreases the chances of bone fractures, and improves your digestion.

Wow, right?

My Healthy Kale Chips are delicious and good for you. I love the inevitable crunchy sound they make too. I’ve tried only eating handful, but usually end up munching on the entire bowl. When finished, I think “you just ate all of that kale?” I ate the whole bag!

Baking kale chips couldn’t be easier because you only need three ingredients and an oven. I buy the longer leafy variety at the farmers’ market, but you can also pick it up at the grocery store near the lettuce section. I made these healthy babies twice in one week.

Step 1: Clean and dry the kale. Preheat oven to 300 degrees.

Step 2: Remove the middle stems with a knife.

The stem doesn't soften when baked and leaves a bitter taste.
The stem doesn’t soften when baked and leaves a bitter taste.

Step 3: Toss de-stemmed leaves in a large bowl and toss with 1/2 T. olive oil. Transfer coated leaves to a baking sheet. I prefer to set the leaves on to a metal rack. Sprinkle with a light coating of sea salt.

It's okay if the leaves overlap. A bunch of kale produces two baking sheets worth of leaves.
It’s okay if the leaves overlap. A bunch of kale produces two baking sheets worth of leaves.

Step 4: Bake at 300 degrees for 10 minutes. Monitor the baking process so the leaves don’t scorch.

Step 5: Transfer bake kale leaves to a bowl and serve! If you don’t gobble them all up like me in one sitting, you can leave them out on the counter overnight or store them in a Ziplock bag.

healthy-kale-chips1

onedelightfullife.com

Healthy Kale Chips

10 minPrep Time

10 minCook Time

20 minTotal Time

Save RecipeSave Recipe
Print Recipe
My Recipes My Lists My Calendar

Ingredients

  • 1 large bunch broad leaf kale
  • 1/2 T. olive oil
  • heavy pinch sea salt

Instructions

  1. Preheat oven to 300 degrees.
  2. Wash and dry kale leaves.
  3. Remove stems using a knife.
  4. Transfer de-stemmed leaves to a large bowl.
  5. Toss in 1/2 T. olive oil using your hands.
  6. Transfer coated leaves to a baking rack on top of a cookie sheet.
  7. Sprinkle with a heavy pinch of sea salt.
  8. Back at 300 degrees for 10 minutes. Monitor baking so the leaves don't burn.

Notes

Swap seasoning salt for sea salt, if you want to zestier tasting kale chips.

7.8.1.2
44
https://onedelightfullife.com/how-to-make-healthy-kale-chips/
onedelightfullife.com

Nutrition

Fat

7 g
Click Here For Full Nutrition, Exchanges, and My Plate Info
ESHA Logo

Try swapping kale chips for artificially flavored bagged chips or top your baked potato with them.

Signature ODL 170x70px

Filed Under: Appetizers, Taste Tagged With: appetizer, baked vegetables, healthy food, kale, kale chips, vegetable

Primary Sidebar

SEARCH

Ammar
Hello! I'm Vanessa. Welcome to One Delightful Life, a blog created to add more delight to your life with delicious recipes, travel destinations, and lifestyle improvement ideas. Thanks for exploring my blog!

Archives

Contact Us

  • Email
    info@onedelightfullife.com

Popular Posts

Back to School Brain Breaks12K Total Shares
Going Underground in Historic Ellinwood, KansasGoing Underground in Historic Ellinwood, Kansas7K Total Shares
Weston, Missouri: Making the Most of a Weekend VisitWeston, Missouri: Making the Most of a Weekend Visit2K Total Shares
Cucumber Lime Vodka SplashCucumber Lime Vodka Splash1K Total Shares
How to Make the Most of a Weekend in Omaha, NebraskaHow to Make the Most of a Weekend in Omaha, Nebraska484 Total Shares
  • About
  • Taste
  • Travel
  • DIY
  • Contact
  • Lifestyle
  • 100 Things to Do in Wichita Before You Die

© 2023 · onedelightfullife ·